Listings
TABS
- Claimed: Listings that are claimed.
- Unclaimed: By default, all new listings come under the Unclaimed tab. Once a listing is claimed, it will be moved to the Claimed section.
- Inactive: Deactivated or newly submitted listings.
- Featured: Sponsored listings
- Expired: Package or membership expired listings
- Spammed: Unsolicited listings
- Deleted: Listings deleted by the administrator
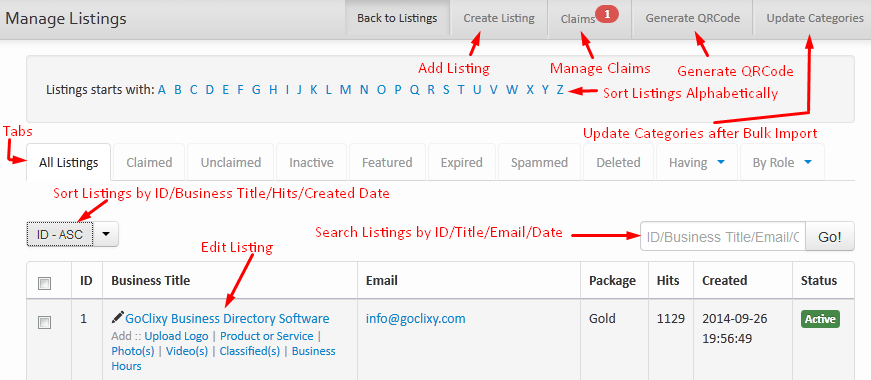
Having:
- Logo: Listings with logo
- Product or Service: Listings with products or services
- Photos: Listings with images
- Videos: Listings with videos
- Classifieds: Listings with classifieds
- Business Hours: Listings with business hours
- By Role: Filter listings based on user role. For instance, to see all listings added by the administrator, click By Role and select Administrator.
Create a New Listing
- Log in to your GoClixy Administration Panel (Dashboard).
- Go to Content->Listings and click the Create Listing tab.
- As needed, select a package, user and categories. Add a business title, description, and keywords.
- Fill other information: basic, address, contact info, social, map, custom fields, and meta tags.
- When you are ready, click the Save button.
Featured: Display listing in the featured block and on the top list of the results.
Expires On: Leave this field blank as it will be filled automatically based on the package duration.
Edit an Existing Listing
- To edit a listing that already exists on your website, go to Content->Listings.
- Click the name of the listing in the Business Title column. If your list spans several pages, you can click through each page via pagination or enter your listing's title in the search box.
- Make the changes and click the Save button to save your edited listing.
Add Custom Field to Listings
To add a custom field, go to Tools->Custom Fields and click the Create Custom Field link on the top right corner. Fill the information and click the Save button.
Upload Logo

To upload a business logo:
- Login to GoClixy Admin Panel dashboard and go to Content->Listings.
- Under Business Title, click the Upload Logo link. Browse the logo file and click the Update button.
Products or Services

To get started adding a new product or service, find the Product or Service link under the Business Title .
- Click the New Product/Service button
- Add the Title of the product
- Select Product/Service from the Type
- Specify Price (optional) and add Description
- Upload image, then click Save
To edit an existing product/services, click the product name in the Title column. Modify the information and click the Save button.
Photos
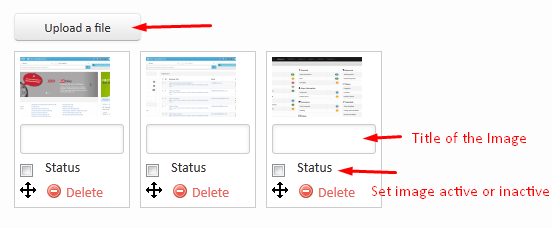
- To upload an image, click Photo(s) link under the Business Title:
- Click the Upload a file button and browse your computer for images that you have saved
- You can upload more than one image at once, just repeat the upload process for each image and it will be added automatically to the business listing.
Videos
You can only add YouTube videos link to a listing; therefore, upload your business video on YouTube and use the link here.

- To add a YouTube video to a listing, log into your GoClixy Admin Panel and find the Video(s) link under the Business Title column.
- Visit YouTube.com, and find the video you want to link to a listing. Copy the URL from the address bar and paste to **Video*** field.
- You can also set a title for your video else GoClixy will automatically grab this information from the YouTube website.
- Click the Save button to store this information.
To edit an existing video, click the video name in the Title column. Modify the information and click the Save button.
Classifieds

- Login to admin panel, go to Content->Listings and find Classified(s) link under the Business Title column.
- Click the New Classified button as shown above.
- Add a Title, image, and other information.
- Once you are done, click the Save button
Valid From Date from which classified will be visible to the frontend users.
Expires On: Date, when classified, will expire
Price: Specify the price for this classified
Buy Link: External website link where visitors can buy this classified
Business Hours
- Log in to the Admin Panel and go to Content->Listings.
- Find the Business Hours link in the Business Title column.
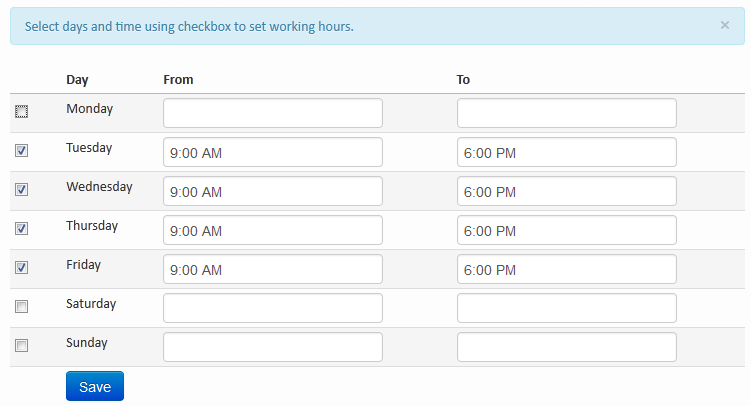
- Select business hours using Timepicker.
- Do not forget to select the checkbox to the left of the Day column or time will not be saved. Uncheck the checkbox to delete existing information.
- To mark a day close, leave the box unchecked.
- Click the Save button
Claims
The claim feature lets visitors claim a listing on your website as their listing. When they claim a listing, they are prompted to pay the claim price. The user must purchase a subscription before the claim.
To view all claimed listings, click the Claims tab.


To approve a claim, select Active from the dropdown list in the Status column. To send an email to the user, check the Notify Customer checkbox and click the Save button.
TABS
- Active: New claims
- Approved: Claims approved by the administrator
- Rejected: Disapproved claims
- Forged: Faked or false claims
- Canceled: Claims canceled by the administrator
GENERATE QRCODE
A QR Code is a two-dimensional barcode consisting of a black and white pattern that contains listing URL address. With the help of QR Code Generator, a QR Code can be created within seconds and in four simple steps.
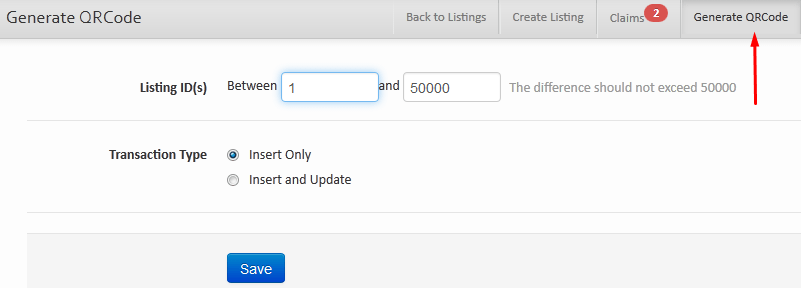
- Go to Content->Listings and click the Generate QRCode tab.
- Input the start and end ID of the listing and QRCode will be generated for all listings having ids between the provided input. The difference should not exceed 50000.
- Select Insertion type:
- Insert Only: Generate QRCode for new listings only. If a listing with QRCode already exists, that will be ignored.
- Insert and Update: Generate QRCode for all listings, insert new QRCode and update existing.
- Click the Save button and listings are ready with QRCode.
Update Categories
IMPORTANT FOR MULTI-LEVEL CATEGORIES
After bulk listings import, you must enable them for multi-level categories. Go to Content->Listings and click the Update Categories tab.
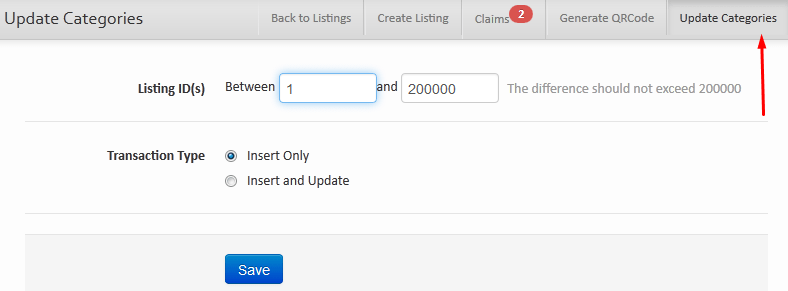
- Input the start and end ID of the listing. The difference should not exceed 200000.
- Select Insertion type:
- Insert Only: Insert categories for new listings only.
- Insert and Update: Insert and update categories for all listings.
- Click the Save button.
Link Validator
Check for broken website URLs using our Link Validator module. This tool will automatically find and delete the broken website URLs from all listings.
Note: Validating link is a slow process, use this tool in chunks.
Update Slug
A slug is the part of a URL that identifies a particular listing, product, blog, etc. on your website in an easy to read form. You may need this tool after bulk listings import. Use it to automatically generate slugs for all imported listings.
Tweak Fields
Do not forget to tweak fields after bulk listings import. You can also use this option if you are having a search issue. This tool is a search optimizer. This also fixes the images, categories, and locations issue around the whole website.
Bulk Purge
Do you want to purge businesses, categories, products, blogs, etc. in bulk? use this option. This permanently removes the selected information from your website. Deleting businesses one by one is a slow process and can sometimes take hours to delete a few thousand listings. Use this option when you want to purge data in bulk.
What is a Printed Version?
Download your listings in the most famous format of the yellow pages printed directory.
This option is added for those who are in the Advertisement business and want to distribute a hard copy of listings in a community for advertisement purposes. You can download listings in a PDF format and print them as a flyer. Distribute these flyers in the local community to build trust.
What is the Bulk Users Generate option?
Do you have thousands of listings for import?
Import them through our Import/Export module and generate users in bulk through our Bulk Users Generate option. This will automatically create user accounts on your website. You can send these login details to listings owners through our Settings->Emailer module, they can log in to your website using these details and modify their listings from their member area.